Quinoa Stuffed Bell Peppers

Since I’m not always crazy about meat, when I eat out at nicer restaurants I’m always curious to try their vegetarian option.  At many restaurants it’s simply a salad, or a standard veggie burger or eggplant parmesan.  Not my favorites.  To me, the vegetarian option is a great test for a restaurant, because I think it can really show their level of creativity and willingness to showcase certain ingredients.

The more creative menus are starting to have more complex vegetarian dishes involving some more interesting components.  I think one of the downfalls that I have encountered, however is the level of complexity.  Often an unscale vegetarian option might have two or three times the number of ingredients of most of the other options on the menu.  In my opinion this level of complexity often takes away from the overall success of the dish because there are more variables that might not succeed.

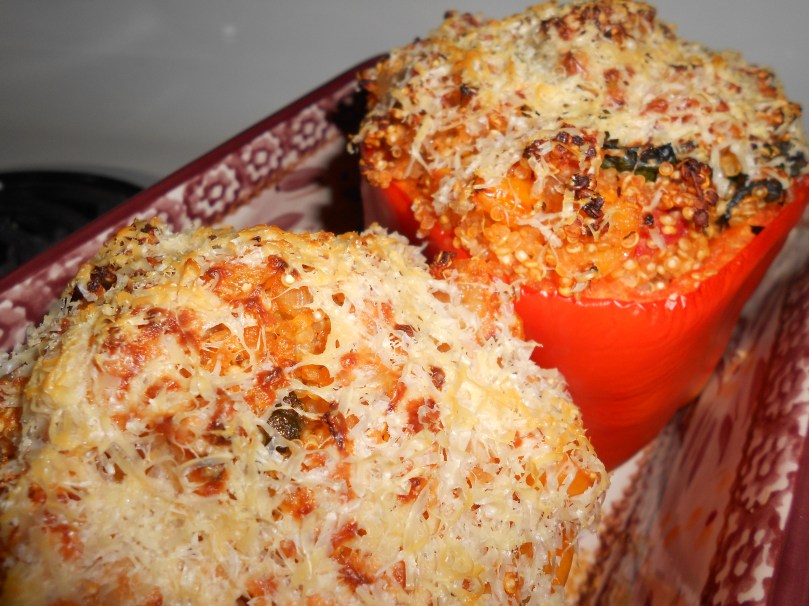
That being said, there was one relatively simple vegetarian dish I tried at Salt Creek Grille  (no longer on the menu) that inspired a recipe that I not make fairly regularly.  The dish at the restaurant was quinoa stuffed bell peppers that were simply red peppers filled with quinoa mixed with peices of mango, and covered in cheese.  Even though it was pretty simple, it just worked.  It was filling, fresh, healthy, and slighlty indulgent all at the same time.

In creating my variation on this dish I decided to bring in the veggies that I like the most.  I stuck with the concept of stuffing a bell pepper with quinoa, and topping it with cheese, but I added some other simple goodies.  It’s a great side dish and very easy to stick in the fridge and grab for a snack or a quick meal.

Quinoa Stuffed Bell Peppers

Ingredients

  • 5 medium bell peppers (1 diced, 4 with the top sliced off and the inside cleaned)
  • Olive Oil
  • 1 medium yellow onion diced
  • 2 tsp italian seasoning
  • 3 cloves garlic minced
  • 1 can diced tomatoes (15 oz)
  • 1 1/2 cups quinoa
  • 1 cup broccoli florets (fresh or frozen)
  • handful fresh spinach
  • 2 cups grated parmesan

Method

  1. Preheat the oven to 375 and bake the 4 bell peppers with the tops cut off for about 15 minutes until they are slightly softer but not too flimsy.
  2. Heat up a large saute pan on the stove over medium heat.  Add a couple tablespoons of olive oil and saute the diced onion.  After onions begin to get translucent, turn down heat slightly and add the minced garlic, diced bell pepper, and Italian seasoning.saute time
  3. Allow to cook for about 5 more minutes, then pour in the can of diced tomatoes and a cup of water.  Return heat to medium and allow the mixture to heat up, then add the uncooked quinoa.
  4. The quinoa will take about 15 minutes to cook through.  Towards the end of this process add the broccoli and fresh spinach.  When the quinoa is cooked through stir 1 cup of grated parmesan to the mixture.
  5. Turn the oven up to 400.  Portion the filling into the 4 bell peppers and top each with the remaining cup of parmesan.  Bake in the oven about 15-20 minutes until the cheese on top is melted and golden brown.
  6. Remove from oven, allow to cool for a few minutes and enjoy!yum!

Valentine’s Day

IMG_0841

Happy Valentine’s Day everyone. Normally I ignore that this holiday exists, but this year I get the chance to embrace it. Even if you don’t have a valentine this year, there is reason to celebrate. Valentine’s Day should be about spoiling yourself and celebrating all the people that love who you are. Tonight, I have a date with my friend Kelly to watch Vampire Diaries with a glass of champagne and some sweet delectable treats to snack on. I’d say I’m going to have a Happy Valentine’s Day even though I can’t be with my valentine 😉

To my Chi Omega sisters, I found the cute owl tea towels at TJ Maxx. As you all know, I just couldn’t resist.

Check One Off The List!

I’m not sure if you remember, but one of my goals for 2013 was to try some new cooking techniques.  One of the techniques I mentioned trying was making marshmallows. Mission accomplished, cross it off the list!

I decided it would be festive to make pink marshmallows for Valentines Day. And I was right, it is festive.  I looked around at some different recipes online. It’s tricky when you’re trying something new because there are a few different techniques or ingredients.  Some recipes call for powdered sugar, egg whites, or corn starch, but I went with a much simpler version from Ina Garten.

The recipe I used reminded me of my White Mountain Frosting debacle because there is a similar technique of combining corn syrup, water, and sugar in a saucepan and heating to 240 degrees.  While a little labor and time intensive, I was happy to learn that making marshmallows was not difficult.

Additionally, these were a tremendous crowd pleaser.  There’s something about a fresh marshmallow that will make your day that much better!  These are definitely worth the time and effort! (by the way, these have “dry out” overnight, so make sure you budget your time)

Valentine Marshmallows

Yields 20-40 marshmallows depending on size, adapted from Ina Garten

Ingredients

  • 3 packets of unflavored gelatin
  • 1 cup light corn syrup
  • 1 ½ cups granulated sugar
  • 1 tsp vanilla extract
  • ¼ tsp salt
  • red food color gel (optional)
  • powdered sugar for dusting
  • 1 cup semi-sweet chocolate chips
  • 1 cup white chocolate chips

Method

  1. Prepare a 9 x 13 brownie pan with parchment and dust the bottom with powdered sugar.
  2. In a mixing bowl combine the gelatin with a ½ cup of water.  Allow the gelatin to “bloom” (I think it’s called) while you cook the other mixture.  Some recipes recommend a full half hour.gelatin blooming
  3. In a saucepan over medium heat, combine the corn syrup, sugar, and a half cup of water. After the sugar melts, turn the heat up to high, and cook until it reaches 240 degrees (use a candy thermometer).sauce pan
  4. Once the mixture has reached the correct temperature, remove from heat.  Use an electric hand or stand mixer to mix the gelatin on low as you pour in the warm mixture in very slowly.  Once the mixture has been completely poured in, mix it on high for about 15 minutes until the “fluff” is pretty thick.after 5 minutesafter 15 minutes
  5. Add vanilla, salt, and food coloring and mix until well distributed.now it's pink!
  6. Pour the batter into the prepared pan and use a spatula smooth it out.  This process will be a little sticky and difficult, but you will persevere.
  7. Dust the top of the fluff with powdered sugar (it is easy if you pass it through a sifter).  Allow the fluff to “dry out” overnight.setting overnight
  8. The next day, lift the large marshmallow out of the pan and place on a cutting board.  Use a knife or a cookie cutter to cut out the marshmallows. what to do with the scraps?looking good
  9. Microwave the semi-sweet chocolate chips for 30 seconds at a time until mostly melted.  Use a fork to stir the chocolate until smooth. Dip the marshmallows in the chocolate, and allow to dry.
  10. Microwave the white chocolate similarly and place in a pastry bag with a fine tip or a Ziplock bag with a small corner snipped off.  Once the semi-sweet chocolate has set, use the white chocolate to drizzle a design on top of the layer of chocolate.so pretty!
  11. Allow to set at room temperature or place in the freezer to speed up the process.  Enjoy!