Putting Cookies in the Mail

Over the last few years I’ve gotten in the habit of sending my grandparents cookie care packages about once a quarter. I don’t live very close to my grandparents in Long Island or my grandmother in Georgia, so sending them cookies is my way of telling them that I’m thinking about them and reminding them that I’m a fantastic baker.

Sadie Dishes- Putting Cookies in the Mail

I’ve probably sent somewhere between 50 and 100 baked good care packages through the mail over the past five years to my grandparents and other assorted friends and family, and I’ve developed somewhat of a formula. When it comes to packages for the grandparents I usually include three things:

  • about a dozen of a seasonal cookie
  • about a dozen of a heartier (perhaps more nutritious) cookie
  • a couple mini loafs of a quick bread

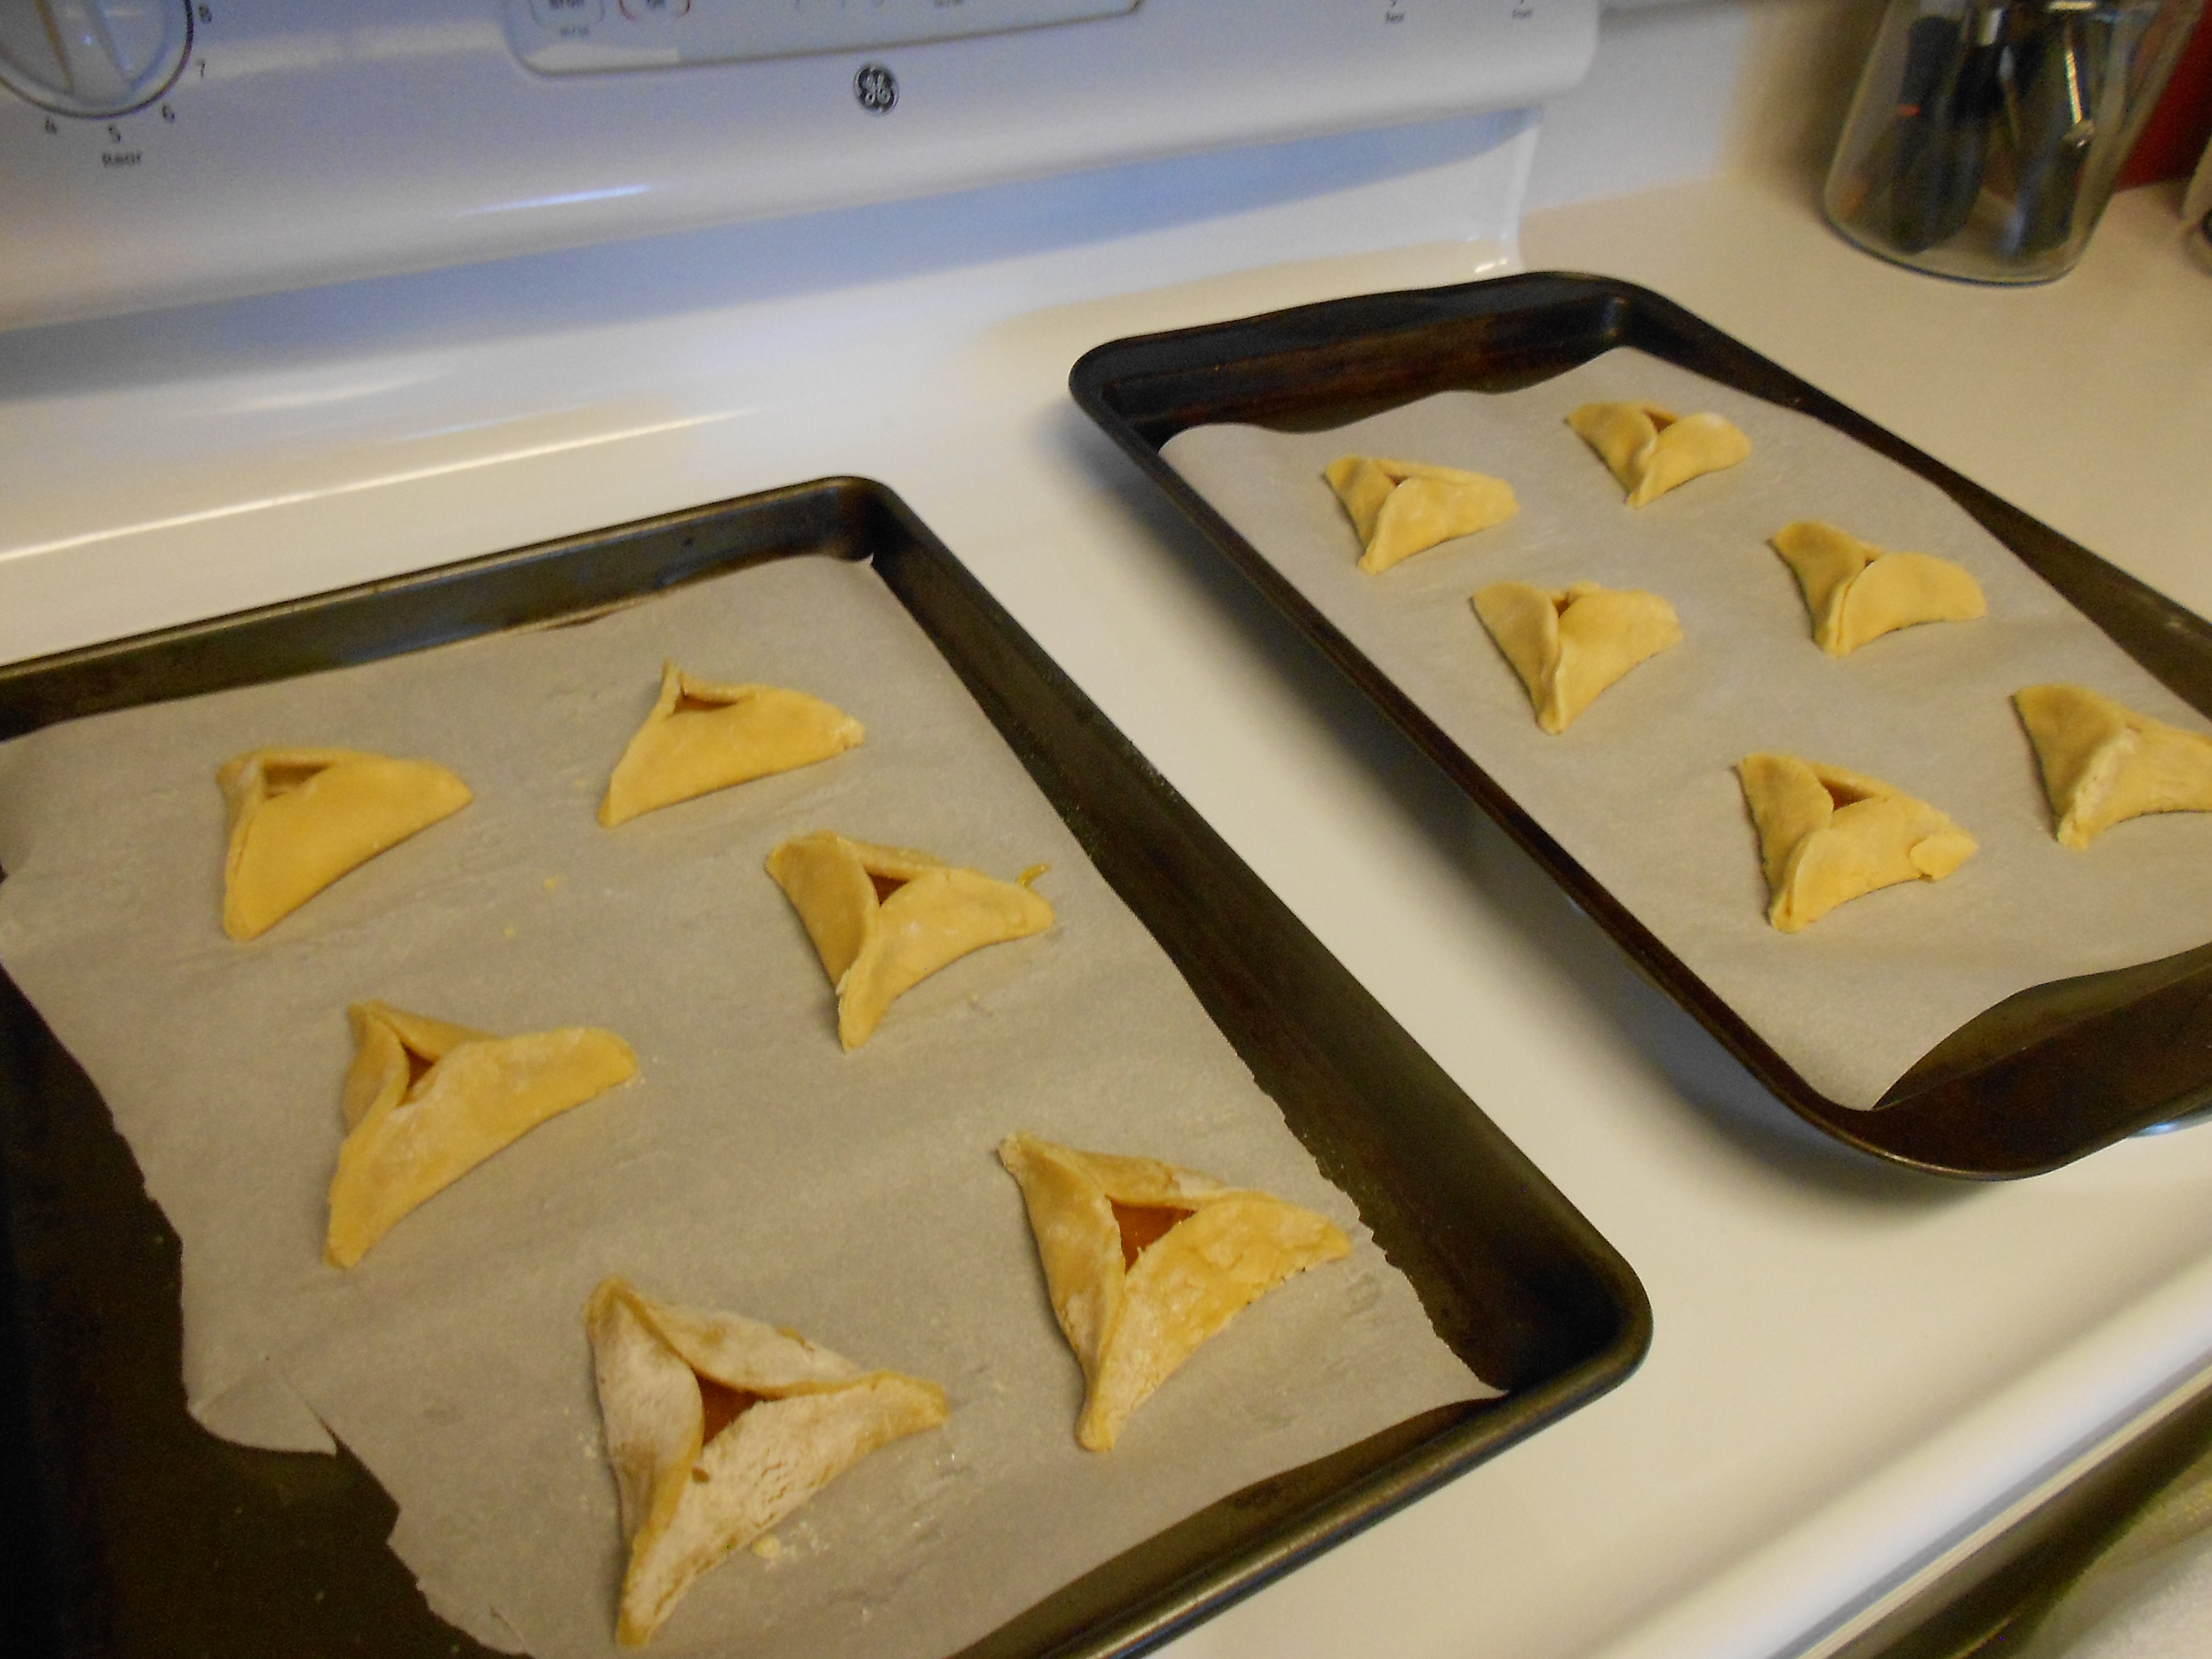
The purpose of the seasonal cookies is obviously to make the package festive. In December it’s a Christmas cookie; in the spring it’s heart shaped shortbread, Hamentashen, or coconut macaroons; in the fall it’s something pumpkin oriented; and the summer is kind of a wild card. The heartier choice is sort of the same idea as putting vegetables in your kid’s mac and cheese. Cookies with oats, dried cranberries, nuts, or bananas add a couple little nutritional elements to my grandparent’s limited daily diet. I know that my cookies are better for them than any of the baked goods they buy at the grocery store. Lastly, I throw in one or two mini loaves of a quick bread. I usually do banana bread because it’s just so easy, but I’ll also do cranberry nut bread or zucchini bread. I just know my grandparents all love quick bread so I try to always include it.

Sadie Dishes- Putting Cookies in the Mail

This past weekend I baked for a care package for my Grandfather in Long Island. He’s turning 94 next week! Keeping that in mind, I made two of his favorites- Hamentashen (it’s Purim season) and banana bread. I also added chunky lola cookies (adding Craisons to the recipe) for a little extra something.

Sadie Dishes- Putting Cookies in the Mail

Here are a few pro tips to remember for mailing cookies:

  • do bake as close to mailing as possible (I usually bake Sunday afternoon and mail first thing Monday morning)
  • don’t be shy with the bubble wrap, peanuts, newspaper, etc.- cookies need cushioning
  • do include a quick note that identifies the enclosed items
  • don’t make anything too fancy, delicate, or perishable because it will not hold up in the mail- btw cookies covered in powdered sugar do not usually look great when they arrive, but they probably still taste good
  • do allow everything to cool completely before you package them

Happy Baking!

V-Day Baking Brainstorm

On the one hand, Valentine’s Day is all about the date night, but on the other hand it’s all about classroom card exchange and an excuse to baking everything in the shape of red and pink hearts. As we know I love an excuse to bake with a theme or season in mind, so I have done a lot of the latter over the years. If you’re thinking about baking this week, I have three ideas at three different difficulty levels.

Sadie Dishes- Valentine's Day Baking

Heart Shaped Pink Rice Krispie Treats

This options wins when you think about effort vs. reward. You just take the standard recipe, add a little red food coloring, and presto- Valentine’s Day Rice Krispie Treats!

Ingredients

  • 4 Tbs butter
  • 1.5 10 oz. bags of mini marshmallows
  • 1 tsp vanilla extract
  • red food coloring
  • 6 cups Rice Krispie Treats
  • Themed mix ins- sprinkles, white chocolate chips, etc.
  • Heart shaped cookie cutter

Method

  1. Melt the butter in a sauce pan or small stock pot over the stove on low/medium heat.
  2. Add 1 bag of marshmallows to melted butter and allow to melt together. Add vanilla extract to melted mixture. Add drops of food coloring until you get the color you want (less is more for food coloring, take it easy).
  3. Have the six cups of Rice Krispies and half bag of marshmallows ready in a large bowl.
  4. Add warm butter and marshmallow mixture to the cereal and leftover marshmallows. Stir until uniform. At this time you can add in sprinkles or any other mix-ins you would like. I add the sprinkles later on so they don’t melt completely.
  5. Transfer to a 9 x 13 baking pan and allow to cool. Then use cookie cutters to create heart shapes!

Heart Shaped Shortbread

Shortbread sounds a little boring, but you bring these to work and your co-workers have one with their morning coffee and you will be their best friend forever. You can dip half the heart in chocolate and add pink or red sprinkles to make them fancy. I use Ina Garten’s classic shortbread recipe for this. It says is makes 20 cookies, but my guess is that you get more than that.

Ingredients

  • 3/4 pound unsalted butter, at room temperature (three sticks)
  • 1 cup sugar
  • 1 tsp pure vanilla extract
  • 3 1/2 cups all-purpose flour
  • 1/4 tsp salt
  • 6 to 7 ounces very good semisweet chocolate, finely chopped (you can use chocolate chips)
  • Sprinkles or nuts for decoration

Method

  1. Cream butter and sugar together until the mixture is light and fluffy (about 5 minutes). Add vanilla extract to mixture.
  2. In a separate bowl sift together the flour and salt. Then slowly combine the wet and dry mixtures, trying not to over mix.
  3. Chill the dough for at least 30 minutes to overnight.
  4. Preheat the oven to 350.
  5. Roll the dough out to quarter to a half inch thick depending on how thick you would like the cookies. Use your heart shaped cookie cutter to cut out the cookies and place on a parchment lined cookie sheet.
  6. Bake cookies at 350 for 20-25 minutes until just slightly golden brown. They shouldn’t get too much color.
  7. Melt the chocolate in 30 second increments in the microwave. Once it’s shiny you can just stir it until it’s all melted together.
  8. Use a spoon to paint half of the baked and cooled cookies with chocolate. If you would like you can dip the chocolate part in sprinkles or chopped nuts to add a little je ne sais quoi. Allow chocolate to cool and solidify before storing.

Heart Shaped Marshmallows

Here’s where the degree of difficulty gets ramped up a little. This is for when you’re baking to impress. If I were you, I would not start making these on a whim because they take some time, effort, and a serious clean up. The plus side is you get major bragging rights, because you just made marshmallows from scratch!

Ingredients

  • 3 packets of unflavored gelatin
  • 1 cup light corn syrup
  • 1 ½ cups granulated sugar
  • 1 tsp vanilla extract
  • ¼ tsp salt
  • red food color gel (optional)
  • powdered sugar for dusting
  • 1 cup semi-sweet chocolate chips
  • 1 cup white chocolate chips

Method

  1. Prepare a 9 x 13 brownie pan with parchment and dust the bottom with powdered sugar.
  2. In a mixing bowl combine the gelatin with a ½ cup of water.  Allow the gelatin to “bloom” (I think it’s called) while you cook the other mixture.  Some recipes recommend a full half hour.
  3. In a saucepan over medium heat, combine the corn syrup, sugar, and a half cup of water. After the sugar melts, turn the heat up to high, and cook until it reaches 240 degrees (use a candy thermometer).
  4. Once the mixture has reached the correct temperature, remove from heat.  Use an electric hand or stand mixer to mix the gelatin on low as you pour in the warm mixture in very slowly.  Once the mixture has been completely poured in, mix it on high for about 15 minutes until the “fluff” is pretty thick.
  5. Add vanilla, salt, and food coloring and mix until well distributed.
  6. Pour the batter into the prepared pan and use a spatula smooth it out.  This process will be a little sticky and difficult, but you will persevere.
  7. Dust the top of the fluff with powdered sugar (it is easy if you pass it through a sifter).  Allow the fluff to “dry out” overnight.
  8. The next day, lift the large marshmallow out of the pan and place on a cutting board.  Use a knife or a heart shaped cookie cutter to cut out the marshmallows.
  9. Microwave the semi-sweet chocolate chips for 30 seconds at a time until mostly melted.  Use a fork to stir the chocolate until smooth. Dip the marshmallows in the chocolate, and allow to dry.
  10. Microwave the white chocolate similarly and place in a pastry bag with a fine tip or a Ziplock bag with a small corner snipped off.  Once the semi-sweet chocolate has set, use the white chocolate to drizzle a design on top of the layer of chocolate.
  11. Allow to set at room temperature or place in the freezer to speed up the process.  Enjoy!

What are you making to celebrate?

Baking Day Best Practices

About once a quarter, I do a big baking day where I make 3-5 recipes in a day either for an event or a holiday. After doing this several times, it can be a very long afternoon, but I’ve gleaned a few best practices to make the day as efficient and manageable as possible. And believe me, when you’re baking for a crowd this holiday season, any time saved is a win!

Game plan. With several recipes on the to-do list, I take a look at baking times, temperatures, and any tricky details in the recipes. If I’m making a cake or quick bread, I usually throw that in the oven first because it takes longer, and then prepare the rest of the batters while it’s baking. I also check the baking temperatures to see what I can bake at the same time, and think about what needs a special pan or utensil (so I don’t use it for another recipe by accident).

Recipes

Check your recipes. I always check the recipes the day before for two reasons: 1. to make sure I have all the ingredients or to write my grocery list, and 2. many cookie recipes require chilling the dough for 30 minutes up to overnight, so I better make the dough early if it needs to be chilled! Also, if you need anything like butter to be at room temperature, you know you’ll need to set it out early! Forgetting to read the recipes early has definitely screwed me over in the past.

Wash dishes as you go, but clean the kitchen after. The thing about baking is that there is always downtime when things are in the oven. My advice is to get started on the dishes as soon as you put the first batch in the oven. I find it a lot more manageable if you just keep doing dishes throughout. I’m sorry if I sound like your mother. There’s no point in trying to wipe down the counters and clean the floor, however, until everything is out of the oven and stored away. If you’re a Virgo like me, definitely summon the energy to clean up as soon as you’re done. I hate waking up the next morning to a kitchen full of crumbs!

dishes!

Set up an extra garbage bag. Similar to how Rachel Ray keeps a garbage bowl on the counter to toss waste in while she’s prepping and cooking, I usually set up an extra plastic or paper bag for all of the empty ingredient wrappers and boxes. I don’t want to fill up my regular trash with all the packaging, so I just toss that down the trash chute when I’m done (perks of living in a high rise apartment!).

garbage


Got any good tips for me?